Sunday, March 24, 2024

How to execute selenium test in Github Actions

 Create a simple Maven TestNG Selenium project as below.


        System.setProperty("webdriver.chrome.driver", "/usr/local/bin/chromedriver");

        ChromeOptions chromeOptions = new ChromeOptions();

        chromeOptions.addArguments("--headless");

        driver = new ChromeDriver(chromeOptions);

        driver.get("https://www.xxxx.com/playlists");

        WebElement element = driver.findElement(By.xpath("(//*[@class='yt-simple-endpoint style-scope ytd-playlist-thumbnail'])[4]"));

        element.click();

        driver.quit();


Make sure to give a correct web driver path when you are testing the code in our local environment.

We will change it when we deploy it to GitHub actions.


Now push your code GitHub and enable actions from the project settings section.


Create a new yml file which will automatically generate when you select maven build project.

There will be a new yml file available as for the below screen shot.
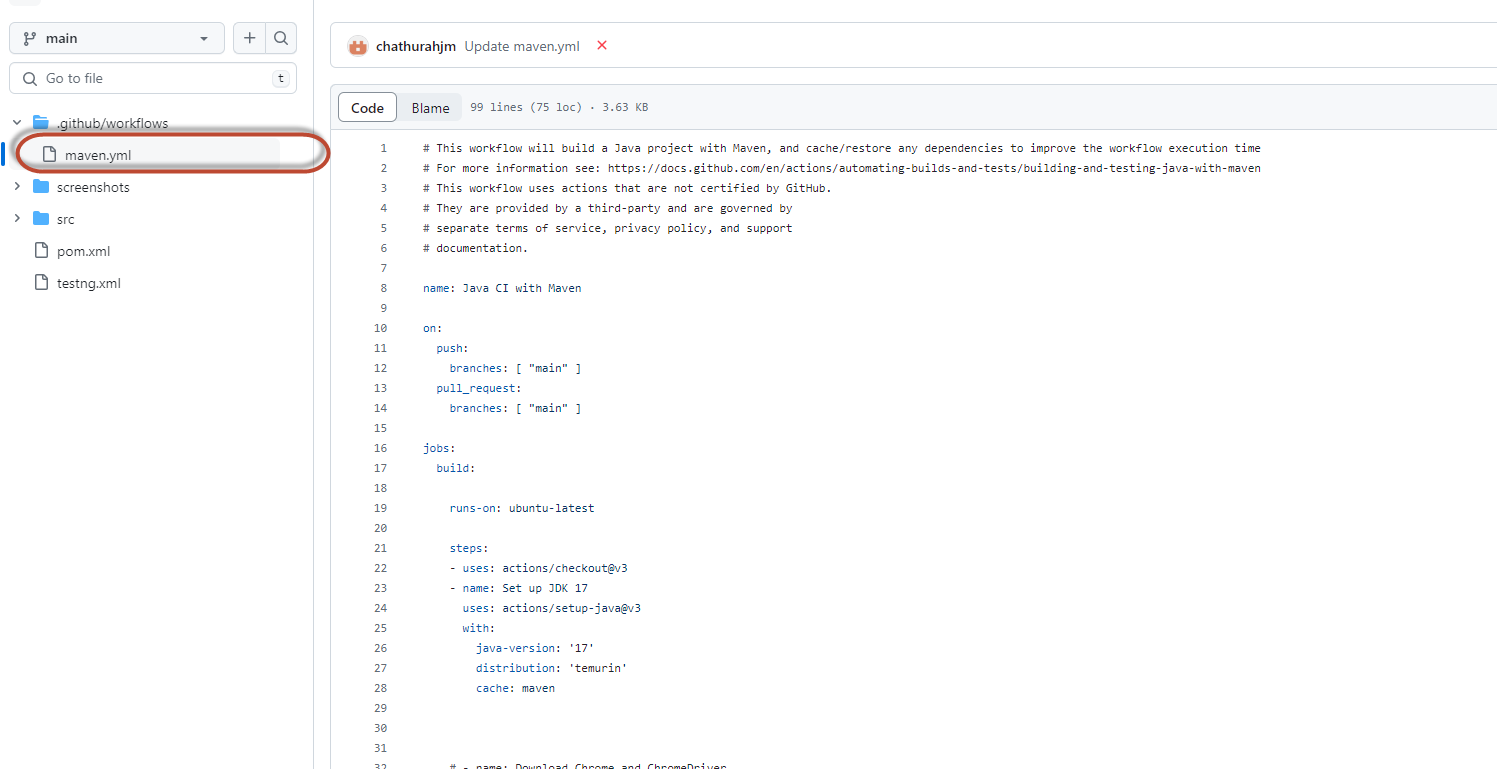


In adition to default content I have to add

  • Chrome driver
  • Chrome web browser

This is the code to download above from the yml file.

 # Download Chrome version 114.0.5735.90

    - name: Download ChromeDriver

      run: | 


          # Download Chrome version 114.0.5735.90

          wget -q "https://dl.google.com/linux/chrome/deb/pool/main/g/google-chrome-stable/google-chrome-stable_114.0.5735.90-1_amd64.deb" -O chrome.deb

          # Install Chrome

          sudo dpkg -i chrome.deb

          # Install dependencies

          sudo apt-get install -f

          # Clean up

          rm chrome.deb

          LATEST_CHROMEDRIVER_VERSION=$(curl -s "https://chromedriver.storage.googleapis.com/LATEST_RELEASE")

          wget "https://chromedriver.storage.googleapis.com/${LATEST_CHROMEDRIVER_VERSION}/chromedriver_linux64.zip" -P ~/

          unzip ~/chromedriver_linux64.zip -d ~/ && rm ~/chromedriver_linux64.zip

          sudo mv -f ~/chromedriver /usr/local/bin/chromedriver

          sudo chmod +x /usr/local/bin/chromedriver


Then add below code to execute the test.

    - name: Build with Maven

      run: mvn clean install -B


You can find the full code with copying screen shots  at https://github.com/chathurahjm/gitActionWIthScreenShots


Friday, March 1, 2024

How to execute custome jar file in JMeter

1). Create your jar file using Eclipse.

2). Because Eclipse will allow you to convert a single java method (without any main method) to a jar file.

  • Package name  : tempDBUpdate
  • Class name : update
  • Method name : updatedb

All my libraries are inside reference Libraries folder.


3). Convert to a jar file by right-click on your project → select Export → Select JAR file under java folder.


4). Move the newly generated jar file to JMeter \apache-jmeter-5.6.3\apache-jmeter-5.6.3\lib\ext folder.

5). From open JMeter and add a JSR223 Sampler

6). Set language as groovy

7). Import the jar file as for the line number 1.

8). Create an object of the class as for the line 3.

9). Call the method.


Dont use Main method to call in J Meter as it will give errors and it will not call the actual Main method implementations.

Don't use IntelliJ to cremate jar files as IntelliJ only allow Main method to convert to jar file.


Monday, February 19, 2024

How to re execute failed Selenium / Playwright Java testcases with the help of TestNG

  1. Create a new class with any name at the test project.
  2. With this class we are going to implement the IRetryAnalyzer class which is available with TestNG
  3. Here is the sample working implementation.
import com.novatti.common.Constants;
import org.testng.IRetryAnalyzer;
import org.testng.ITestResult;

public class RetryAnalyzer implements IRetryAnalyzer {

private static int maxTry = 3;
private int count = 0;

@Override
public boolean retry(ITestResult iTestResult) {
System.out.println("------------------------ Retrying test: " + iTestResult.getName());
if (!Constants.IS_RETRY) maxTry = 0;

if (!iTestResult.isSuccess()) {
if (count < maxTry) {
count++;
iTestResult.setStatus(ITestResult.FAILURE);
return true;
} else {
iTestResult.setStatus(ITestResult.FAILURE);
}
} else {
iTestResult.setStatus(ITestResult.SUCCESS);
}
return false;
}
}

4. Then create another class to make all our rest methods and test classes to transform to above class at the run time.
Or we can manually update each test method which is not the best approach.

5. From the new class we are going to implement IAnnotationTransformer  interface which is inbuilt with TestNG.

6. Here is the sample working implementation.

import com.novatti.utils.RetryAnalyzer;
import java.lang.reflect.Constructor;
import java.lang.reflect.Method;
import org.testng.IAnnotationTransformer;
import org.testng.annotations.ITestAnnotation;

public class TestNGRetryListener implements IAnnotationTransformer {
@Override
public void transform(
ITestAnnotation annotation, Class testClass, Constructor testConstructor, Method testMethod) {
annotation.setRetryAnalyzer(RetryAnalyzer.class);
}
}

7. Now add the above class as a listner to your testNG.xml file.
8. Here is the sample working implementation.

DOCTYPE suite SYSTEM "http://testng.org/testng-1.0.dtd">
<suite name="UI Test Suite">
<listeners>
<listener class-name="com.XXXXXX.listeners.TestNGRetryListener"/>
</listeners>
<test verbose="1" preserve-order="false" name="UI Tests">
<classes>
<class name="com.xxx.tests.XXXXX"/>
<class name="com.xx.tests.XXXXXXXX"/>
<class name="com.xx.tests.XXXXXX"/>

</classes>
</test>
</suite>


9. Now everytime when you tigger the testNG.xml file it will listen to the TestNGRetryListener   
class and pick the failed testcases.

10. Then it will retry for the count you have set at the maxTry variable.
private static int maxTry = 3;

I'm with Test NG version 7.9.0


Thursday, April 20, 2023

How to wait till page load selenium Java.

 public void waitTillDocumentStateReady()

{
LocalDateTime now = LocalDateTime.now();
while (LocalDateTime.now().isBefore(now.plusSeconds(20))) {
while (!((JavascriptExecutor) driver.getDriver()).executeScript("return document.readyState").equals("complete")) {
driver.sleep(1);
}
}
}

Monday, November 14, 2022

While loop with specific time to wait until element get displayed in selenium C# and java

 public static void waitForOneTrust()

        {

            var stopwatch = new Stopwatch();

            stopwatch.Start();


            while (stopwatch.Elapsed < TimeSpan.FromSeconds(30))

            {

                IWebElement oneTrust = driver.FindElement(By.Id("onetrust-accept-btn-handler"));

                if (oneTrust.Displayed)

                {

                    break;

                }


            }

        }


In Java:

public void waitTillBackOfficePageLoad()
{
LocalDateTime now = LocalDateTime.now();
while (LocalDateTime.now().isBefore(now.plusSeconds(30)))
{

if(
xxxxxx)
{
break;
}

}
}

Tuesday, November 16, 2021

Fix:Postman Export Is Not Working With C# Rest Client

When I initially export the API call from postman I didn't get the yellow highlighted lines.

I had to manually add those 2.

Then only this start working on C# Rest client.

So make sure to add headers when importing Request from Postmant to C# or other language.


var client1 = new RestClient("https://qtm4j-cloud-prod-4.s3.amazonaws.com/");

            client1.Timeout = -1;

            var request = new RestRequest(Method.POST);


            request.AddHeader("apiKey", "" + APIKey+ "");

            request.AddHeader("Content-Type", "application/json");

            request.AddHeader("Content-Type", "multipart/form-data");

            request.AddParameter("acl", "authenticated-read");

            request.AddParameter("key", "" + key + "");

            request.AddParameter("policy", "" + Policy + "");

            request.AddParameter("success_action_status", "201");

            request.AddParameter("x-amz-algorithm", "AWS4-HMAC-SHA256");

            request.AddParameter("x-amz-credential", "" + Credential +"");

            request.AddParameter("x-amz-date", "" + Date + "");

            request.AddParameter("x-amz-signature", "" + signature + "");

            request.AddParameter("x-amz-Meta-file-name", "" + FileName + "");

            request.AddParameter("x-amz-Meta-b", "" + Meta_b+ "");

            request.AddParameter("x-amz-Meta-a", "" + Meta_a + "");

            request.AddParameter("x-amz-Meta-c", "" + Meta_c + "");

            request.AddParameter("x-amz-Meta-tc-id", "" + TC_ID + "");

            request.AddParameter("x-amz-Meta-tc-version-id", "" + VersionID + "");

            request.AddParameter("x-amz-Meta-tc-version-no", "" + TC_Version_No + "");

            request.AddFile("file", FileLocationName);

            try

            {

                IRestResponse response = client1.Execute(request);


                if (response.Content.ToString().Contains("</Location><Bucket>"))

                {

Tuesday, June 8, 2021

Publish your github project to sonarcloud.io

 1). Go to sonarcloud.io and click on the "+" icon at the top of the screen.


2). Then click on the Choose an organization on GitHub

3). You will be redirected to your GitHub account and from there you have to select the repository which include your project.(From here you will give permissions to SonarCloud, to access the repositorys)


4). Then you will re-direct to SonarCloud and you will see something similar to this.

5). Select with GitHub actions

6). Then will navigate to an instruction page.

7). Follow the 1st instruction as it is.

8). Add below aditionl command to the build.gradle file. (Source can be any thing,This can be different based on your project structure)
property "sonar.sources", "."

After step 8 I had only sonar related things in my build.gradle file, Becouse I had few errors when try to update my existing build.gradle file with sonar settings.

9). Next follow the 2nd step. If you don't have a workflows folder inside .github, please create it manually and just copy and paste the content as it is.


10). Then do some changes to any of your code and make a commit.

11). Navigate to Actions menu.


12). Because of your commit, an action should be triggered.

13). If all the above steps are correct you should see the build log and there should not be any errors.


14). Finally, navigate back to https://sonarcloud.io/  you should see the dashboard with all the details.